
On This Page8 sections
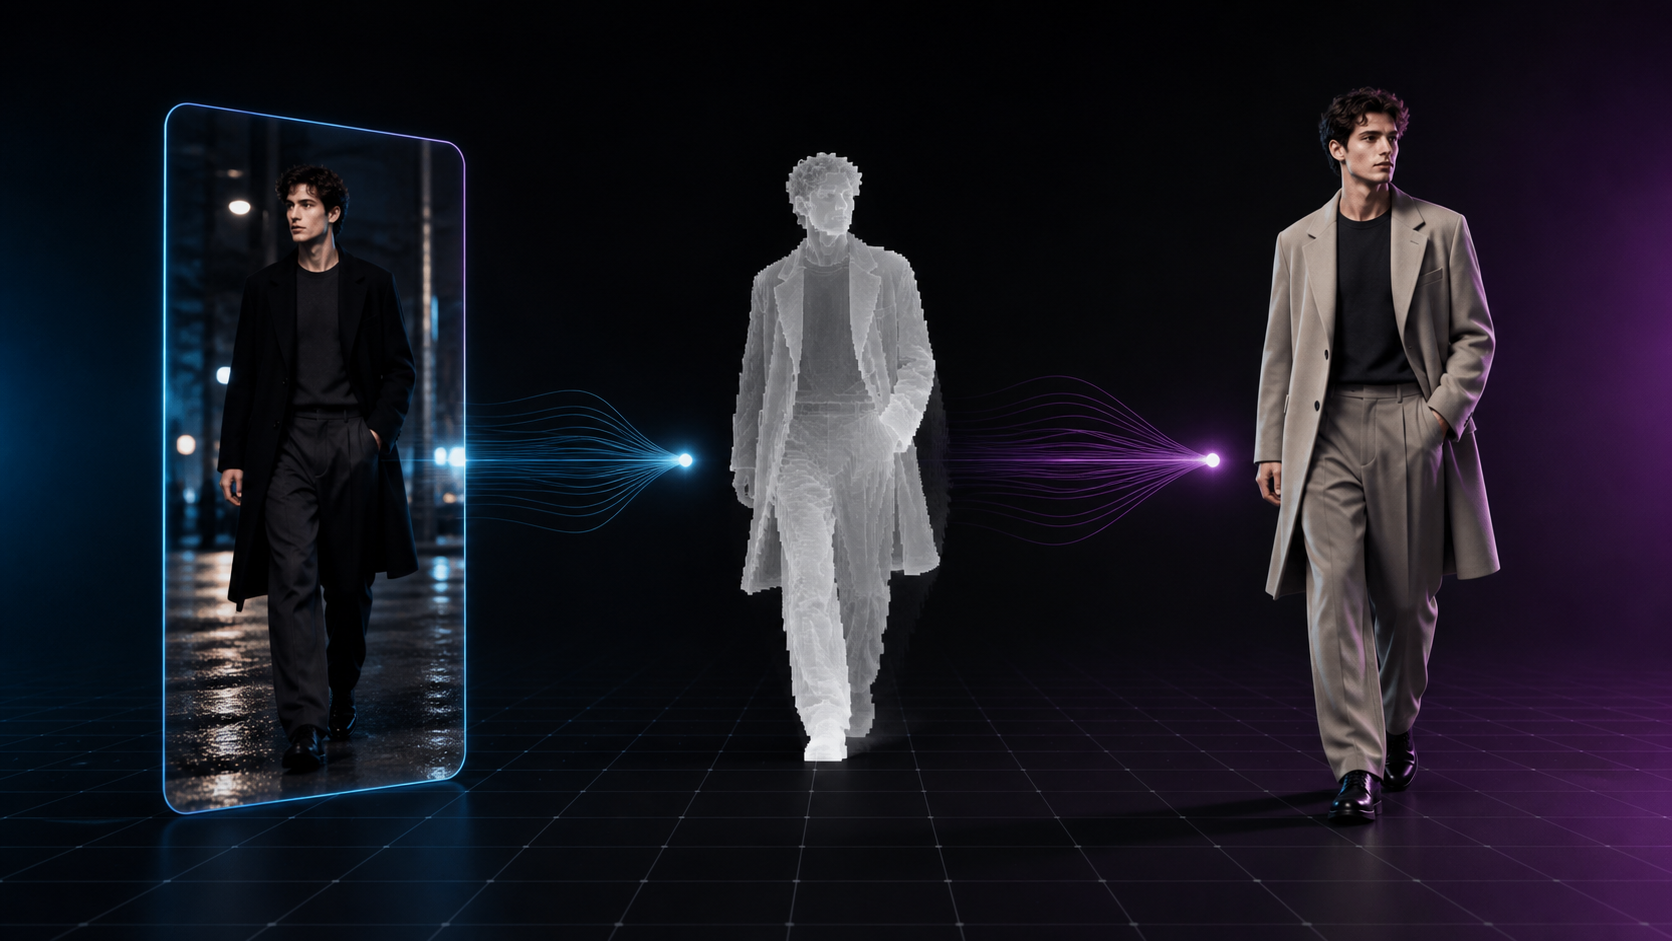
A short AI video can look simple while hiding a surprisingly difficult problem: how do you keep the original motion, pose timing, framing, and camera movement while replacing the person and visual style?
A recent workflow demonstrated by Li Yue offers a practical answer. Instead of trying to describe every shot in a long text prompt, it separates the video into three controllable layers:
- a depth video for motion, geometry, composition, and camera movement;
- a character sheet for identity, body shape, clothing, and accessories;
- a generation prompt for the scene, lighting, materials, and visual style.
Codex coordinates the local depth-extraction workflow, while MiniMax H3 re-renders the performance with the new character. The result is a much more repeatable process than attempting to reverse-engineer an entire reference clip with text alone.
This guide turns that demonstration into a production-ready standard operating procedure.
The Complete Workflow
Reference video
      ↓
Codex + local GPU
      ↓
Temporally consistent grayscale depth video
      ↓
Character turnaround sheet
      ↓
Depth video + character sheet → MiniMax H3
      ↓
Quality control and prompt correction
      ↓
Final video
The original demonstration used Codex to prepare the depth pass locally and then supplied both the depth video and a character reference to MiniMax H3 through LibTV Agent. The creator reported that depth extraction took roughly 11 minutes on an RTX 3060. Treat that number as an anecdotal benchmark: resolution, frame rate, clip length, model size, and available VRAM can change processing time significantly.
Example Outputs from the Original Demonstration
These two short clips show the kind of character and camera consistency this workflow is designed to preserve.
The important idea is not the specific character or outfit. It is the separation of movement and spatial structure from identity and appearance.
Phase 1: Choose the Right Reference Video
The depth pass preserves much more than a rough pose. It can carry:
- body posture and movement rhythm;
- the subject's path through the frame;
- distance between the subject and camera;
- foreground and background relationships;
- camera height and camera motion;
- composition changes over time;
- large occlusion boundaries.
Start with a clip that makes those signals easy to read. A good first reference is usually:
- 5 to 10 seconds long;
- one continuous shot;
- centered on one clearly visible subject;
- free of heavy motion blur;
- shot with moderate, predictable camera movement;
- minimally occluded by other people or objects.
Fashion walks, turns, simple dance moves, product demonstrations, and controlled studio shots are strong candidates. Rapid edits, severe occlusion, whip pans, complex hand choreography, and very fast movement are more likely to produce unstable results.
Use a small, explicit project structure:
video-remake/
├── reference.mp4
├── character.png
├── prompt.txt
└── outputs/
    ├── depth.mp4
    ├── draft-01.mp4
    └── final.mp4
Keep reference.mp4 unchanged. It is your timing master and the source you will use for every quality check.
Phase 2: Use Codex to Produce the Depth Video
Strictly speaking, Codex is not the model estimating depth. Codex acts as the agent that inspects the machine, installs or calls the depth model, uses the local GPU, processes the clip, verifies the output, and reports any mismatch.
For a reproducible local setup, Video Depth Anything is a sensible choice because it is designed for temporally consistent video depth rather than unrelated frame-by-frame estimates. Its official command supports Small, Base, and Large encoders and can save grayscale output directly.
On a mid-range GPU, begin with the Small encoder (vits). Increase model size only if the result needs it and memory allows.
Reusable Codex Prompt
Place reference.mp4 in the working directory and give Codex this instruction:
Analyze reference.mp4 in the current directory and create a
temporally consistent grayscale depth video for AI video control.

Requirements:

1. Prefer the official Video Depth Anything implementation.
2. Use the local NVIDIA GPU with CUDA.
3. Begin with the Small encoder (vits) unless hardware inspection
   shows that a larger model is safe and materially useful.
4. Preserve the source video's duration, FPS, resolution, aspect
   ratio, frame order, and playback speed.
5. Do not crop, retime, interpolate, or change the shot.
6. Save grayscale depth only, not a colored depth visualization.
7. Write the final file to outputs/depth.mp4.
8. Install missing dependencies in an isolated project environment.
9. After generation, verify duration, frame count, FPS, resolution,
   temporal flicker, subject-outline continuity, and depth continuity.
10. Complete the task without asking for confirmation unless an
    unsafe or destructive action would be required.
Direct Video Depth Anything Command
If the environment is already prepared, the core inference command is conceptually:
python3 run.py \
  --input_video ../reference.mp4 \
  --output_dir ../outputs \
  --encoder vits \
  --target_fps -1 \
  --grayscale
The project may choose its own generated filename, so normalize the accepted result to outputs/depth.mp4 afterward. Do not assume that a successful process exit means the depth pass is usable.
Validate Before Sending Anything to H3
Compare the source and depth files with ffprobe:
ffprobe -v error \
  -select_streams v:0 \
  -show_entries stream=width,height,r_frame_rate,nb_frames \
  -show_entries format=duration \
  -of json reference.mp4

ffprobe -v error \
  -select_streams v:0 \
  -show_entries stream=width,height,r_frame_rate,nb_frames \
  -show_entries format=duration \
  -of json outputs/depth.mp4
Then watch the full depth clip. Look for:
- flashing brightness between adjacent frames;
- a subject outline that collapses or changes shape;
- depth layers that suddenly reverse;
- missing limbs or foreground objects;
- a different crop, frame rate, or playback speed;
- duplicated or dropped frames.
If the depth pass is unstable, fix it before generation. H3 cannot reliably reconstruct motion from a broken geometric guide.
Phase 3: Build a Character Turnaround Sheet
The depth video tells the model how the subject moves. The character sheet tells it who is moving.
Use at least three full-body views of the same character:
- front view;
- strict 90-degree side view;
- back view.
For better facial consistency, add a clear face close-up. A four-view sheet containing a portrait plus front, side, and back full-body views is usually more useful than a single cinematic character image.
Character Sheet Prompt
Create a photorealistic character turnaround sheet of the same
adult woman in every view.

Layout:
- left: clear close-up portrait;
- right: full-body front view, strict 90-degree side view,
  and complete back view.

Identity constraints:
- exactly the same face and facial proportions;
- exactly the same hairstyle and hair color;
- exactly the same body proportions;
- exactly the same clothing, shoes, and accessories.

Pose and environment:
- neutral standing pose with arms relaxed;
- seamless pure white studio background;
- soft, even lighting;
- no props, text, labels, logos, or dramatic shadows;
- no cropped feet or hidden garment details.

Prioritize identity consistency and production-reference clarity
over cinematic composition.
Inspect the sheet as if it were a 3D modeling reference. Reject it if the side view is not truly side-on, the rear hairstyle is hidden, the shoes are cropped, or the face and outfit change between views. A weak turnaround sheet cannot be repaired by adding more adjectives to the video prompt.
Phase 4: Re-render the Video in MiniMax H3
The core inputs are:
Reference 1: character turnaround sheet
Purpose: identity, face, hair, body, clothing

Reference 2: grayscale depth video
Purpose: geometry, motion, timing, composition, camera
Reference controls vary between interfaces, but the intended hierarchy is clear: the depth video should dominate motion and camera structure, the character sheet should dominate identity, and the text prompt should define the new environment and rendering style.
Reusable H3 Prompt
Use the depth video as the highest-priority spatial, motion,
timing, and camera guide.

Strictly preserve from the depth video:
- body pose and movement timing;
- movement path;
- subject-to-camera distance;
- spatial depth relationships;
- camera trajectory and camera height;
- composition and subject position in the frame.

Do not redesign the action. Do not add new camera movement.
Do not change the timing of the original shot.

Replace the person represented in the depth video with the exact
character from the character reference.

Strictly preserve throughout the entire video:
- facial identity and facial proportions;
- hairstyle;
- body proportions;
- clothing, shoes, and accessories.

The same person must remain consistent from the first frame to the
last. No face drift, body-shape changes, wardrobe changes, or
identity transitions.

Re-render the abstract depth structure as:
[DESCRIBE THE NEW SCENE HERE]

Example scene:
A photorealistic commercial fashion shoot in a seamless white
studio, with soft natural studio lighting, a clean white floor,
and no furniture, equipment, text, logos, or clutter.

Keep the original motion, spatial structure, composition, and
camera path. Produce continuous natural movement, stable anatomy,
complete limbs, natural hands, low temporal flicker, and consistent
character identity.
Avoid filling the prompt with generic quality words before the control instructions are clear. Terms such as “cinematic,” “masterpiece,” and “8K” cannot compensate for ambiguous motion or identity constraints.
Optional: Keep the Original Video as a Third Reference
The public workflow primarily uses the depth video and character sheet. However, if your H3 interface supports an additional video reference, retaining the original clip can help with information that grayscale depth does not encode well:
- facial expression and eye direction;
- mouth movement;
- finger motion;
- hair dynamics;
- small props;
- subtle timing cues.
Use this extra reference carefully. It can also leak the source person's appearance into the result. Add a strict exclusion instruction:
Use the original video only for facial expression, small motion
details, and timing.

Do not copy the original person's face, hairstyle, clothing, body,
or identity. Character identity must come exclusively from the
character turnaround sheet.
If identity starts drifting toward the source actor, remove the original video and return to the two-reference workflow.
Phase 5: Quality Control and Troubleshooting
Do not evaluate only the first frame. Watch the entire clip at normal speed, then scrub it frame by frame around turns, occlusions, hand movements, and camera-distance changes.
| Problem | First correction to try |
|---|---|
| Face becomes less recognizable | Increase character-reference priority and use a clearer portrait |
| Identity changes mid-shot | Rebuild the turnaround sheet so every view depicts the same person |
| Body proportions change | Add uncropped full-body front, side, and back views |
| Motion no longer matches | Reinforce depth as the primary motion and timing constraint |
| H3 invents camera moves | Add “do not add or alter camera movement” |
| Hands or feet break | Shorten the clip and choose a less complex action |
| Clothing changes | Make garment structure visible and identical in every character view |
| Background objects appear | Tighten scene constraints and explicitly ban props and clutter |
| Subject position drifts | Reinforce composition lock and subject-to-camera distance |
| Video flickers | Reduce fine textures, fast movement, and conflicting visual instructions |
Use one controlled change per iteration. If you simultaneously replace the character sheet, rewrite the prompt, alter the depth pass, and change the clip length, you will not know what fixed or damaged the result.
Final Acceptance Checklist
- Source and generated clips have the intended duration and aspect ratio.
- The key poses occur at the same moments.
- Camera direction and framing remain recognizable.
- The same face, hair, body, and outfit persist through the full shot.
- Hands, feet, and limbs remain acceptable at normal playback speed.
- The background follows the requested scene and does not accumulate artifacts.
- No third-party logo, watermark, or unintended text appears.
- The output has been checked for rights, consent, and platform-policy compliance.
Why This Workflow Works
Traditional prompt-only remakes often look like this:
Reference video
      ↓
Describe the action, camera, and composition in text
      ↓
Generate a new clip
      ↓
Discover that the timing or motion is different
      ↓
Rewrite the prompt and try again
The depth-guided workflow changes the problem:
Reference video
      ↓
Depth video
      ↓
Preserve motion + geometry + camera
      ↓
Replace identity and visual style
      ↓
Re-render
In practical terms:
Depth video
= motion + pose + space + composition + camera

Character sheet
= face + hair + body + wardrobe

Prompt
= environment + materials + lighting + style

MiniMax H3
= controlled re-rendering of those layers
This decomposition is the real breakthrough. It turns a vague “make something like this video” request into a pipeline with inspectable intermediate assets. When a result fails, you can identify whether the problem belongs to geometry, identity, or rendering instead of blindly generating again.
A Reusable Production Template
Once the setup is stable, the recurring workflow becomes:
1. Select a licensed reference clip
2. Run the Codex video-to-depth task
3. Validate outputs/depth.mp4
4. Select a consistent character turnaround sheet
5. Submit depth + character to MiniMax H3
6. Review the full clip and correct one variable at a time
7. Export the accepted final video
The most valuable automation opportunity is Phase 2. A dedicated Codex skill such as $video-to-depth could handle environment checks, CUDA detection, model download, Video Depth Anything inference, grayscale export, FPS alignment, and automated metadata comparison with one instruction.
That reduces each new remake to a simple loop: drop in a reference, wait for a validated depth pass, pair it with a character asset, and render.
Rights and Responsible Use
Motion transfer does not erase the rights attached to the source material. Use reference footage you created, licensed, or are otherwise authorized to transform. Obtain consent before using a real person's likeness, and do not present a synthetic performance as something a person actually did or endorsed.
For commercial work, keep a record of the source license, character permissions, model terms, and final review. The workflow is most useful as a production-control technique—not as a way to copy someone else's identity or publish deceptive media.
Final Takeaway
The strongest part of this method is not a single model or prompt. It is the decision to separate motion and geometry from identity and appearance.
Codex makes the local preprocessing repeatable. Video Depth Anything turns the source clip into a temporally coherent control signal. A carefully built character sheet anchors identity. MiniMax H3 combines the pieces into a new render.
Get those intermediate assets right, and video remake work becomes less like prompt lottery and more like an actual production pipeline.
Continue Reading
More articles connected to the same themes, protocols, and tools.

How to Make a Babydoll Dance AI Video in 2026: One-Photo Templates, Kling Motion Control & Prompts
How to Make the Viral Hotel Lobby AI Video With 2 Photos (2026 Guide + Prompts)

How to Generate the Viral Nicole Kidman Dance AI Video: Step-by-Step Guide, Prompts & Best AI Tools (2026)
Referenced Tools
Browse entries that are adjacent to the topics covered in this article.